Understanding User Settings
User Settings in the Nokē Smart Entry (NSE) system allow customization of configurations specific to each user. While managers can adjust some settings, others are exclusively managed by the users themselves.
Accessing User Settings
As a manager, follow these steps to locate and adjust user settings:
- Navigate to the Users Tab: Log in to the Web Portal and click the Users tab.
- Locate the User: Scroll or use the search function to find the desired user, then click their name.
- Open User Settings: Click the Settings (gear) icon in the top-right corner of the user’s information box.
Breakdown of User Settings
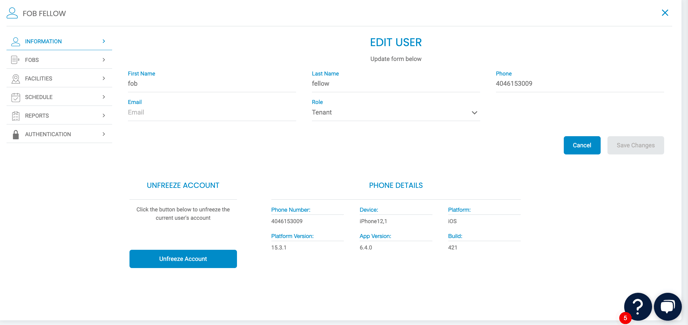
Information Tab
- Displays the user's name, phone number, email, and role.
- You can update the role by selecting a new one from the drop-down menu.
- Roles determine the user's permissions.
- If you want to modify the permissions assigned to a specific role, you can do that on a different page. For more information, you can refer to our Help Center article on Reviewing Permissions.
- Unfreeze Account: Unlock accounts temporarily locked due to multiple failed login attempts.
- Phone Details: Provides device type, platform, and app version for troubleshooting.
Fob Tab
- Lists details about assigned fobs, including their name, MAC number, and a Remove Fob option.
- For more on fobs, refer to our Working with Fobs article.
Facilities Tab
- Displays the facilities accessible to the user:
- Highlighted: Indicates access granted.
- Grayed Out: Indicates no access.
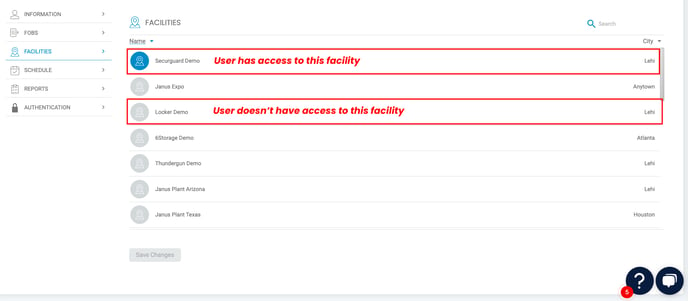
- Grant or revoke access by clicking the respective facility and saving changes.
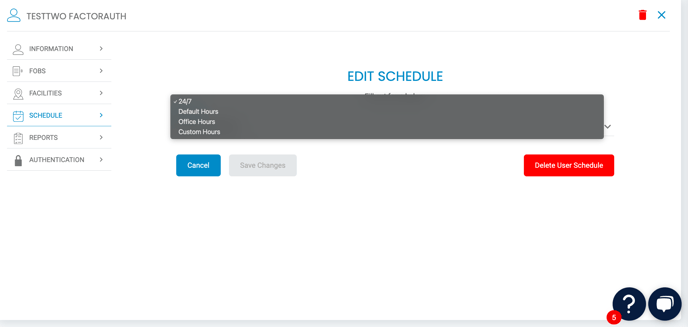
Schedule Tab
- Shows the user’s assigned schedule, dictating their access times.
- Modify the schedule for non-tenant users by selecting a new one from the drop-down menu.
Reports Tab
On the Reports tab, you can view instances where this user has been included in events tracked through the Reports page. These reports are valuable tools that help managers monitor their facility efficiently, stay informed about potential security concerns, and identify areas where additional training may be required.
- Lists reports involving the user to monitor activities or identify training needs.
- Adjust the displayed date range using the Week or Month filters.
For more information about reports, refer to our Help Center articles on Understanding Tenant Reports and Understanding Manager Reports.
Authentication Tab
- Manage Two-Factor Authentication (2FA) settings:
- Enable or disable 2FA.
- Choose the authentication method (email or phone).
- When enabled, users must verify their identity with a PIN upon logging in from a new device.
Personal Settings
Users can customize their preferences in the Web Portal:
- Log in to the Web Portal.
- Click your name in the top-left corner of the navigation bar.

- Click the Settings (gear) icon.
Settings Tab
- Adjust preferences like:
- Temperature Display: Choose Celsius or Fahrenheit.
- Date Format: Select MM/DD/YYYY or DD-MM-YYYY.
- Preferred Language: Updates the language for notifications.
Theme Tab
- Choose from eight themes (light and dark) to personalize the Web Portal's appearance.
Notifications Tab
- Configure how (email, push, SMS) or if you want to receive notifications for specific activities.
See more about how Notifications work here: Setting Up Notifications
By understanding and utilizing User Settings, you can customize and manage user accounts effectively within the NSE system.
Permission(s) Needed:
- View Users
- Manage Users
- Unfreeze User
For more information, click below: