Unit Tasks Widget Overview
The Unit Tasks widget allows you to manage tasks related to facility operations, making it easier for managers to track and assign to-do items. It functions as a digital to-do list within the Nokē Smart Entry (NSE) system, designed to help streamline facility management tasks.
There are three types of unit tasks:
- Automated Tasks: System-generated tasks for follow-up items.
- Facility Tasks: Employee-created tasks via the Web Portal or manager's mobile app. These can include tasks such as prepping units for re-leasing, cleaning after move-out, app onboarding, monitoring tenant activity or notifications, and addressing maintenance issues.
- Tenant Tasks: Tenant-created tasks via the tenant's mobile app. These can include issues like "can't access my unit," "car parked in front of my unit," or similar concerns.
Note: These tasks are only visible to users with the "View Tasks" permission, which is granted by default to roles at the Employee level or higher.
How to Create a New Unit Task
To create a new Unit Task in the Web Portal, follow these steps:
- Navigate to the Unit:
- Open the Web Portal and go to the unit you wish to create the task for.
- Access the Tasks Section:

- Under the Tasks section on the Unit Details page, click the + (plus) icon
 .
.
- Under the Tasks section on the Unit Details page, click the + (plus) icon
- Fill Out the Task Form:
 Once the new form opens, fill in the details for the task:
- Heading: What is the descriptive title of this task?
- Description: What needs to be done to complete this task?
- Assigned User: Who will complete this task?
- Due Date: What date is this task due for completion?
- Once the form is complete, click Add Task.
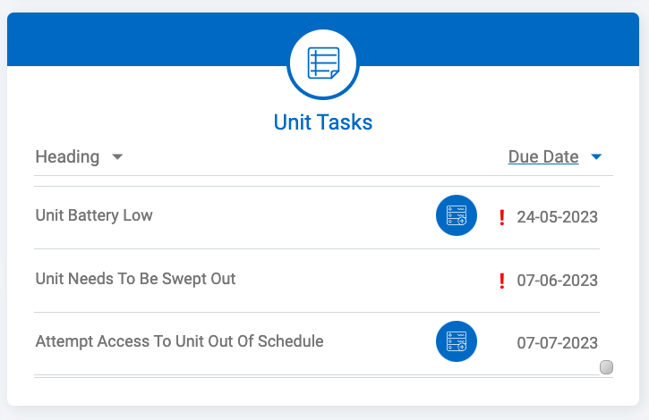
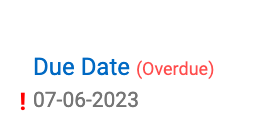
Note: If a task is overdue (i.e., the due date has passed), the task will be highlighted with a red exclamation point next to it.
Managing Unit Tasks from the Dashboard
The Unit Tasks widget on the Home page displays all active tasks that need to be completed. To manage tasks, click on one of the tasks in the widget to open the details window.
Here, you will see options for editing and updating the task:
- Pencil Icon: Click to edit the task details.
- Image Icon: Click to add an image to the task.
- Plus Icon: Click to add comments or updates related to the task
 .
.
You will also notice that in the screenshot, the task has an added image (top left) and a comment.
By clicking on the unit's name (top left corner), you will be directed to the Unit Details page, where you can view all relevant information about the unit and the assigned task.
Marking a Unit Task as Complete
Once the task is completed, mark it as Complete.
- The system-generated tasks will be represented by an automation icon.

- Tasks created by users will be represented by a person icon.

Using the Mobile App for Unit Tasks
You can also view and create unit tasks using the manager's mobile app. This allows for on-the-go management of tasks, making it easy to stay on top of facility operations.
The Unit Tasks widget is an essential tool for managing and tracking facility tasks. By using this widget effectively, you can stay organized, address maintenance issues promptly, and ensure smooth day-to-day operations.
levant information regarding the unit, including the assigned task.
Permission Needed
- View Tasks needed to see the Units Tasks widget as well as view tasks (including tasks assigned to them.)
- Manage Task needed to create, edit, delete, or complete Unit Tasks.
Contact an administrator to add this permission to your role type, if needed.