How a facility manager accesses an occupied unit via the Nokē Storage Smart Entry mobile app or Web Portal using the manager share, emergency, and non-emergency access options.
Three Ways to Access an Occupied Unit
As all self-storage managers know, inevitably they will need to access occupied units from time to time. The facility manager has three options for gaining access to an occupied unit: manager share, non-emergency, and emergency access.
Permissions Setup
To complete the tasks for accessing occupied units, the following permissions must be enabled in the Web Portal for your facility.
Note: You might need a manager to assign these permissions to your role, depending on how your company handles roles and permissions.
To enable the remote access permissions,
- Log in to the Web Portal and click the Settings tab.
- From the Settings page, click the Roles & Permissions tab.
- Click the Search field in the top-right corner and enter the following to access the permissions Access Emergency Unlock, Access Override Unlock, Remote Open.
- Click on the Access Emergency Unlock, Access Override Unlock, and Remote Open circles to activate their permissions. (A check will appear.)
Scenario 1: Manager Shares
There are several reasons why tenants might want to share access to their units with storage facility employees. Some tenants receive package deliveries to the storage facility that need to be placed in their units by your storage facility employees. Or they might need to share access to their units for maintenance purposes.
To do this, you must grant the Open Manager Shares access for the facility. In addition, you'll need to define the Open Manager Shares permission's user role levels for storage facility employee access. Finally, your tenants that want to allow employee access to their units will need to share access to employees from their Nokē Storage Smart Entry mobile app.
The Open Manager Shares permission allows the manager (and other non-tenant roles defined by the facility) access to units shared with management by tenants.
How It's Done
This is a three step process:
- Allow Manager Shares for the facility
- Define the Open Manager Shares permission's user role access for employees
- Share access with Site Employees
Step 1
To allow manager sharing for the facility,
- From the tab menu, click Settings > Facility.
- From the Facility page, scroll to Employee Settings.
- Click the Allow Manager Shares drop-down and then click On.
Step 2
To define the Open Manager Shares permission's user role access for employees,
- From the Web Portal, click Settings > Roles & Permissions.
- From the Roles & Permissions page, locate the Open Manager Shares permission.
- Click the check box to assign the Open Manager Shares permission, and then define which user roles to allow access to units from the Roles list.
Step 3
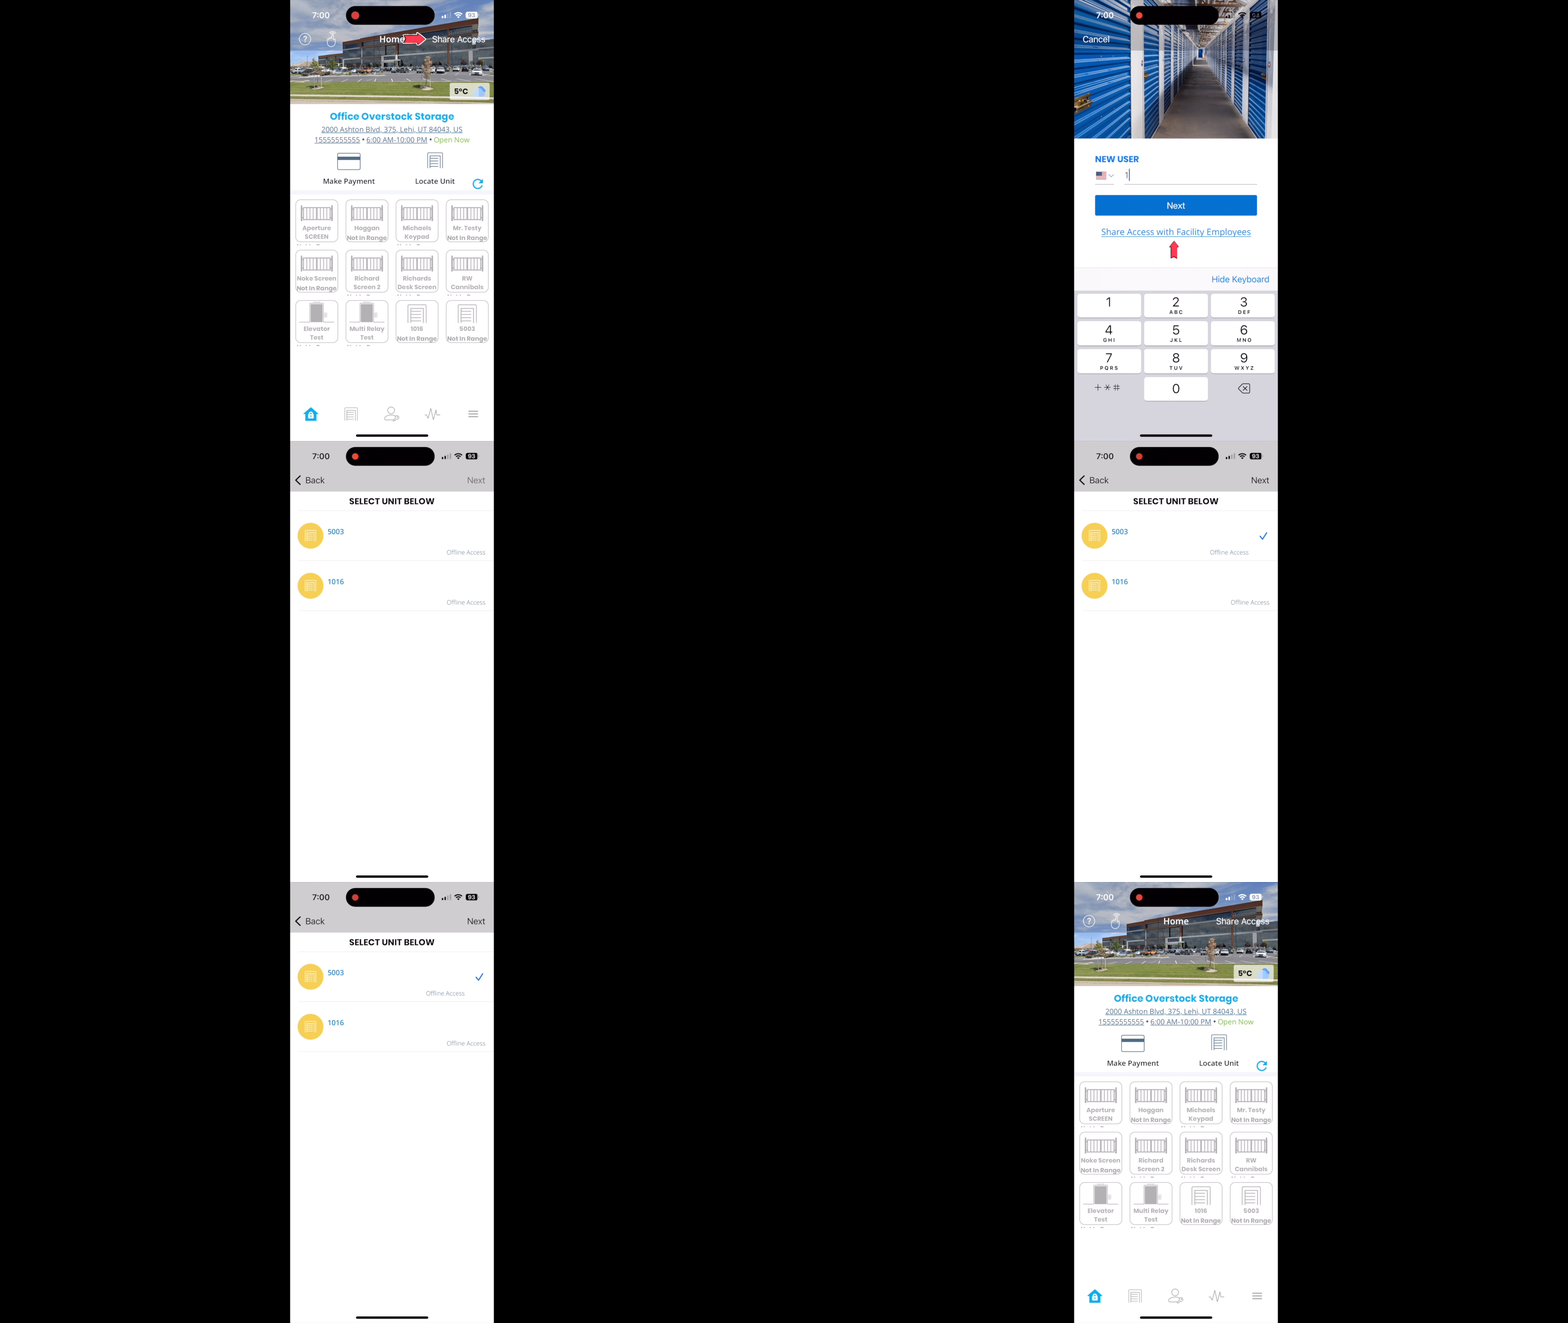
To Share Access with Facility Employees,
- The tenant logs in to the Nokē Storage Smart Entry mobile app.
- Tap Share Access in the top-right corner of the screen.
- Tap Share Access with Site Employees.
- Select the unit(s) to share access with this person, and then tap Yes.
If manager shares are already enabled in the Web Portal, click here:
Sharing Digital Keys with a Manager
Note: Once the tenant shares access with the employee, that employee can access the unit until the tenant deletes the shared access to the unit in his mobile app. This is the preferred option for tenants that want to allow manager access for recurring package deliveries to the unit.
Scenario 2: Text to Open (Non-Emergency Unlock)
A manager can request one-time access to an occupied unit, if she can directly contact the tenant. This is considered a non-emergency 'text-to-open' request. The manager sends the 'text to open' request to the tenant, which includes a PIN that the tenant provides to the manager. The manager uses that PIN to gain one-time access to the unit. This works extremely well if the manager is standing by the unit at the time the call is made to receive the access PIN.
Caution: If you send multiple 'text to open' requests to a tenant, she will receive multiple access PINs, which can be confusing. Send the request, and then wait for the reply with the access PIN. If the tenant does not reply, contact and instruct her to share the one-time access PIN that she received in the text.
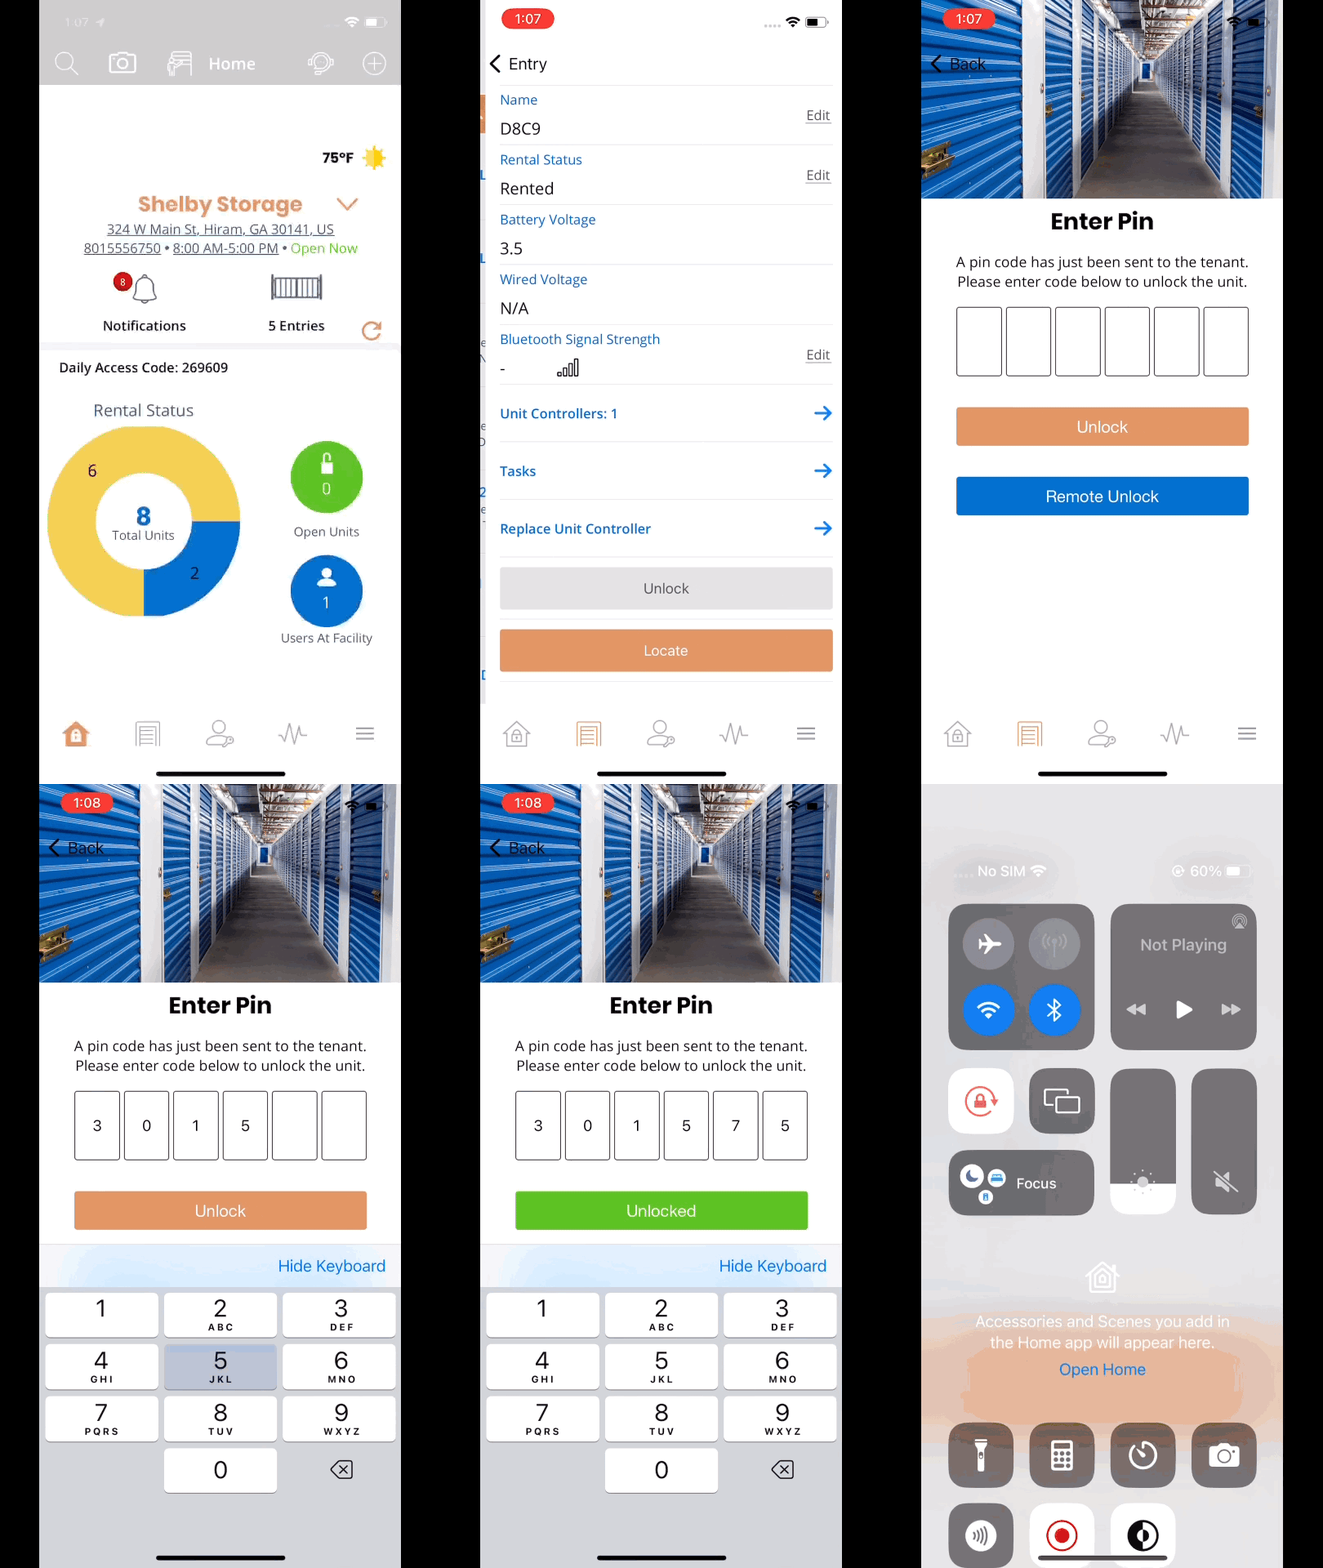
To send a 'text to open' (non-emergency) access request,
- Log in to the manager's mobile app and tap the
(door icon).
- From the Entry page, scroll to the desired unit, and tap it to access the Unit Details screen.
- Tap Unlock. (If you are not within Bluetooth range of the unit, click Yes on the Remote Unlock pop-up message.)
- The tenant receives a text message notifying them of the employee request that includes a PIN to provide to the employee, if access is granted.
- Once the tenant shared PIN is entered, you can tap Unlock, if within Bluetooth range. Or, you can tap Remote Unlock, if not in range.
Can packages be delivered directly to my rental unit?
Note: Non-emergency Unlock is a one-time access request. The tenant does not have to remove access to the unit for the employee to no longer have access to the unit, after the initial access has been completed.
Scenario 3: Emergency Unlock
On occasion, the facility manager needs to gain access to an occupied unit before receiving the tenant's permission. This is the exception to the rule as a measure of last resort. The Nokē Smart Entry system provides a high level permission (Access Emergency Unlock) for this one-time unauthorized access. When an emergency unlock is performed, the tenant receives a notification that the unit was opened.
To unlock the occupied unit,
- Log in to the manager's mobile app and tap the
(door icon).
- From the Entry page, scroll to the desired unit, and then click on it to display more information.
- Scroll to the bottom and tap Unlock.
- A pop-up displays a message that the unit is occupied with prompts for how you want to proceed. If you are unable to contact the tenant to request non-emergency access, and immediate access is needed, tap Emergency to continue.
- You will now be prompted to select a reason emergency access. The reason selected will be included in a text notification to the tenant, so an accurate reason is recommended.
- Once you have selected the reason for requesting the emergency unlock, the tenant receives the notification and the employee is granted a one-time unlock option.
Note: Emergency Unlock is a one-time access request. The tenant does not have to remove access to the unit for the employee to no longer have access to the unit, after the initial access has been completed.
Also, when the unlock command is sent to the unit, there is a 10 second window for the user to unlock the unit. If the unit is not unlocked in this timeframe, the unit will relock itself.
Click below for related articles and tutorial(s):
Occupied Unit Access Assistance (Mobile App)
Occupied Unit Access Assistance (Web Portal)
How do I check out from my unit?
Allow Manager Shares for the Facility
Define the Open Manager Shares Permission's User Role Access for Employees